Our latest update to the MPOP® includes new enhancements to help you efficiently build the most effective email campaigns, easier and faster! Learn about the updates and how to create an email campaign using the MPOP® by watching the video. Video transcript and additional resources included below.
Please note: if you want to use the new email tool functionality, you need to ask your Dealer Teamwork Account Manager or Support to turn it on for your account.
How to Create an Email Campaign Using the MPOP®
Hey, everyone! We’re excited to announce the newest enhancements for the MPOP® email tool, and man, does it look awesome!
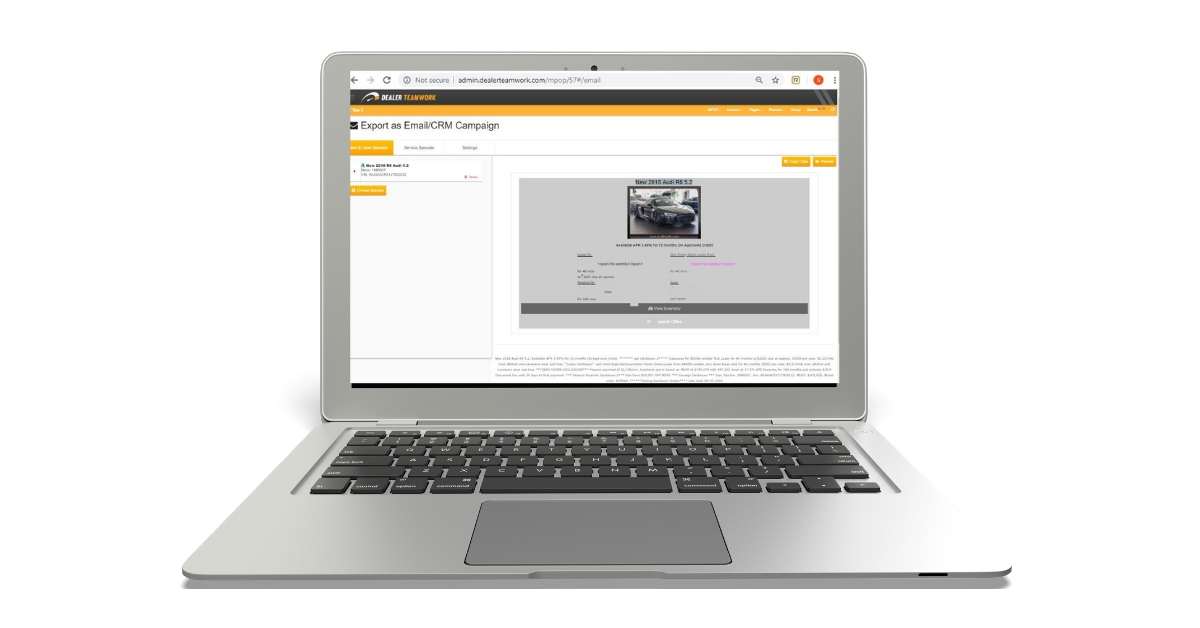
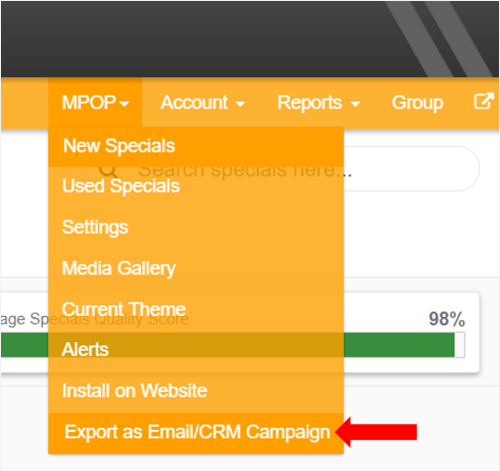
First, you need to navigate to the email campaign builder. Once you log into your account, just like you did before, you’re going to click on MPOP® (NOTE: previously labeled Launch Control) in your navigation menu bar, then select Export as CRM/Email Campaign.
There, you’ll see we’ve updated the entire layout, which makes it even easier to create an email campaign than it was before.
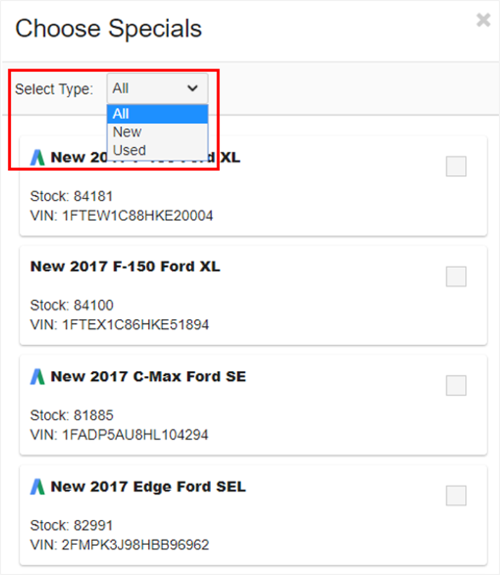
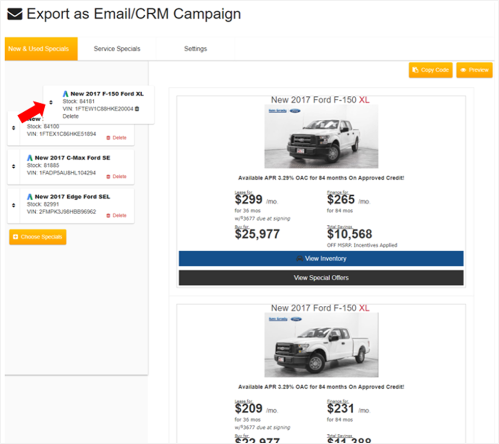
Second, we’re going to click on the Choose Specials button, which allows you to see all of your specials listed between new and used. And, we made it even easier to search for a specific special, because you can now filter by All, New or Used.
Choose Specials
Let’s go ahead and create a new campaign. In the “Choose Specials” window, you can quickly see which specials are listed. You’ll also see which of your specials are included in your paid search campaigns because they are marked with the AdWords icon.
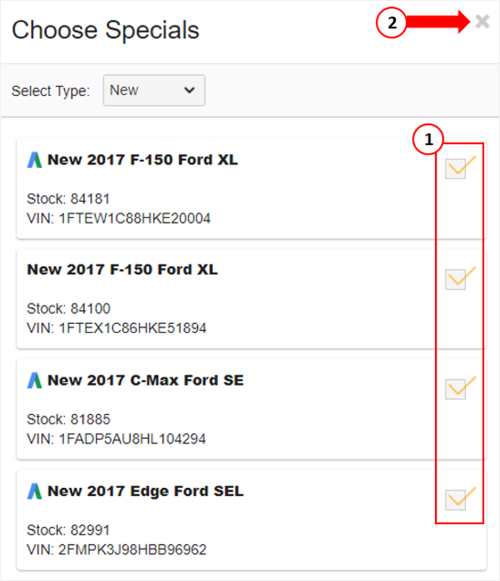
For this example, let’s select the first four vehicles. Once those are selected, you can close the “Choose Specials” window.
You now have your initial template, and you can see how the specials were automatically ordered. But, let’s say you want to change the order. You can easily click to drag, drop and reorder the specials, in real-time, until you get them in the order you’d like. It’s that simple.
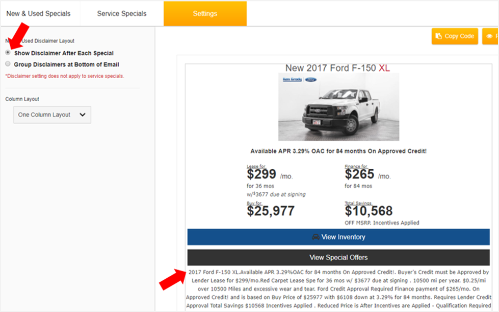
With this latest dev release, we’ve also included a new settings menu for the email campaign builder. You can choose to either show your disclaimers after each special or group the disclaimers at the bottom of the email. Let’s say we want to change the settings to show the disclaimer after each, just select the button.
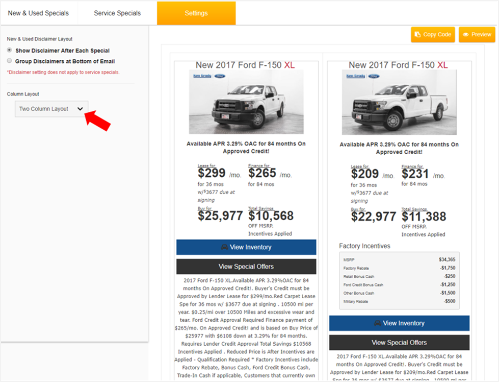
Now, let’s say we want to change this layout from a one-column design to a two-column design. Simply change the Column Layout from One Column Layout to Two Column Layout.
Now we have the order we want, each one listed with a disclaimer and a two-column layout. It’s that easy!
Once you’re happy with the content and layout, click the Copy Code button, and the MPOP® will automatically copy the code needed, right to your clipboard. Then, you can paste it into your CRM.
That’s it – it’s super simple, easy to use and it looks great!
Plus, we made it easy for you to track your MPOP® email campaign performance within your Google Analytics. No third-party reporting; all of your campaign data is 100% accessible in your own account.
Every campaign includes Google UTM tracking codes within the images and CTAs. Creating UTM tags for your email campaigns takes a lot of time. Save more time with pre-set UTM tags and become more productive!
View your email campaign activity by viewing the Source/Medium reporting within the Campaign section of your analytics account.
Want to start using the latest version of the MPOP® Email Tool? Contact your Dealer Teamwork Account Manager or Support now!
This website or its third-party tools process personal data.In case of sale of your personal information, you may opt out by using the link Do not sell my personal information.
This website uses cookies to improve your experience while you navigate through the website. Out of these, the cookies that are categorized as necessary are stored on your browser as they are essential for the working of basic functionalities of the website. We also use third-party cookies that help us analyze and understand how you use this website. These cookies will be stored in your browser only with your consent. You also have the option to opt-out of these cookies. But opting out of some of these cookies may affect your browsing experience.
Necessary cookies are absolutely essential for the website to function properly. These cookies ensure basic functionalities and security features of the website, anonymously.
Cookie
Duration
Description
cookielawinfo-checkbox-analytics
11 months
This cookie is set by GDPR Cookie Consent plugin. The cookie is used to store the user consent for the cookies in the category "Analytics".
cookielawinfo-checkbox-functional
11 months
The cookie is set by GDPR cookie consent to record the user consent for the cookies in the category "Functional".
cookielawinfo-checkbox-necessary
11 months
This cookie is set by GDPR Cookie Consent plugin. The cookies is used to store the user consent for the cookies in the category "Necessary".
cookielawinfo-checkbox-others
11 months
This cookie is set by GDPR Cookie Consent plugin. The cookie is used to store the user consent for the cookies in the category "Other.
cookielawinfo-checkbox-performance
11 months
This cookie is set by GDPR Cookie Consent plugin. The cookie is used to store the user consent for the cookies in the category "Performance".
viewed_cookie_policy
11 months
The cookie is set by the GDPR Cookie Consent plugin and is used to store whether or not user has consented to the use of cookies. It does not store any personal data.
Functional cookies help to perform certain functionalities like sharing the content of the website on social media platforms, collect feedbacks, and other third-party features.
Performance cookies are used to understand and analyze the key performance indexes of the website which helps in delivering a better user experience for the visitors.
Analytical cookies are used to understand how visitors interact with the website. These cookies help provide information on metrics the number of visitors, bounce rate, traffic source, etc.
Advertisement cookies are used to provide visitors with relevant ads and marketing campaigns. These cookies track visitors across websites and collect information to provide customized ads.